Thursday 24 February 2011

Scrappy kitty free pattern


Here as promised is the pattern for the quarter-hour kitty, who I've since renamed Scrappy Kitty. Scrappy Kitty is made from a scrap of worsted weight yarn, honestly you won't need much at all. It's an ideal way to use up all those little bits that you don't know what to do with. She's also filled with scraps of yarn, though of course you can use proper stuffing if you prefer. And Scrappy Kitty would definitely not win any prizes in the amigurumi cat shows. She is not a beautifully crafted, perfect work of art, far from it. But what Scrappy Kitty lacks in beauty, she makes up for in love. She fits perfectly in the smallest hands and pockets and will always be there for a kiss and a cuddle. All the little people you know will be clamouring for one and she's so quick and easy to make that you'll be able to please them all. 


You will need:

A very small amount of worsted weight yarn
A 4.00 mm crochet hook
A very large-eyed blunt needle (aka bodkin)
30 cm of embroidery thread for the facial features
Scissors to snip off all the yarn ends

Legs and body

First leg:

Start with a magic ring 

rnd 1 - 3 sc into magic ring
rnd 2 - 1 sc around

cut the yarn leaving the working loop, and put the first leg to one side.

Work the second leg in the same way, then:

rnd 3 - 1 sc in each of first 2 sts then pass the hook through the loop of the first leg and pull yarn through. Work 1 sc in each of the 3 sts of the second leg, then work an extra sc between the legs, and then 1 sc in the remaining st on the first leg.

That looks a bit complicated but it really isn't. Basically you are joining the two legs together and adding an extra stitch between the legs at the front and back. Remember that crochet is very forgiving and it will be fine if you somehow end up with 8 sc. 

rnd 4-7 - 1 sc around (or work 32 scs if you prefer counting each stitch as I do)

Stuff the body with yarn end scraps or a small amount of polyfill.

rnd 8 - sc2tog 4 times, pull yarn tight and fasten off. 

Arms

Start with a magic ring 

rnd 1 - 3 sc into magic ring
rnd 2 - 1 sc around

Fasten off, leaving a longish tail of yarn to sew the arms to the body.

Sew the arms to the body between rows 6 and 7.

Head, ears and tail

Start with a magic ring 

rnd 1 - 6 sc into magic ring
rnd 2 - 2 sc into each st  (12 sts)
rnd 3-6 - 1 sc around (or work 48 scs if you prefer counting each stitch as I do)

Stuff the head with yarn scraps or polyfill

rnd 7 - 2sctog 6 times, fasten off, leaving AND THIS IS VERY IMPORTANT a very long tail of yarn of around 20 inches or 50 cm.

Now sew the head to the body, then using the bodkin, thread the yarn through to where you want the ears to be.

To make the ears, make a small loop of yarn between two rows of crochet, then pass the yarn through the loop about six times, then pull, adding a couple of stitches in the ear if necessary.

Poke the bodkin through to the other side of the head and make the second ear in the same way.

Now thread the bodkin through the body and out where you want the tail to be. Remove the bodkin, and use the remaining thread to make a chain of crochet. When you reach the body, poke the crochet into a stitch near the base of the tail and pull it through, so it doesn't come undone. Trim the end of the tail.

Finally, embroider a face on your scrappy kitty.

Sunday 20 February 2011

Shopping and crochet, what more could a girl want?

I forgot to tell you about the goodies I bought while I was in the UK. I went to Hobbycraft and it was wonderful! I had to restrain myself from buying everything in the shop - especially the beautiful organic wool at over £5 a ball. It's not that I didn't want to buy it. And I could afford it, really. It's just that I knew if I bought it I wouldn't know what to do with it and I'd be afraid of wasting it. Also, my yarn stock is still rather large and I have promised myself to try to use up everything I have before buying any more. But I have a confession to make... I just COULDN'T resist this:


It's not organic but it is wool. And I just loved the mix of colours. It wasn't expensive either, at £2.99 a ball. I only bought two, then as soon as I got home I wished I'd bought more, but of course by then it was too late and I didn't have time to go back again. Now the question is, what shall I make with it? I don't want to make an amigurumi with it, I was thinking baby hat (my friend recently had a baby boy) but I've still not decided yet. Any ideas?

In Hobbycraft I also stocked up on felt.

Aren't the colours lovely and bright? I do know what I'm going to make with this - some more felt purses and some more owls. At home in France my felt stock had been seriously depleted after my mega-production of owls at the end of last year, so it's nice to have some more and in some beautiful colours too. There are several shades of pink, blue and green, and I'm really looking forward to getting crafting. I also invested in some nice sharp craft scissors that will be very useful and a lot more precise than the nail scissors I've been using up to now to cut my felt. It will be great to be able to make smaller and more detailed shapes and I've already got lots of ideas.

Another thing I started in the UK and have since finished is these wrist warmers. My friend Maria had lent me her wrist warmers one day when it was really cold outside and I wasn't feeling very well, and they were so comforting! I decided to make some myself and here's what I came up with:


They are very simple to make, but I'll put the pattern on a new post so that I can add it to my "Free patterns" list. Did you notice I've added a free patterns and a recipe list just to the right? I'm always happy to receive any comments on how to improve the blog, so if you have any ideas, don't hesitate to tell me.

And last but not least, I've made a tiny little kitty! My original idea was to make a 10-minute teddy, but the ears came our rather pointed, and it took me more than 10 minutes to make. I decided to add a nice long tail, so instead of a 10-minute teddy I'm pleased to introduce you to the quarter-hour kitty! Please let me know if you're interested in the pattern and I'll try to write it down so little kitty can have some new friends.


Have a great week!

Saturday 12 February 2011

Salvage, recover, recycle

This week I came back from a short and very enjoyable visit to the UK. It was lovely to see everyone and to give my little crochet gifts to the children. After the wind and rain that fell upon me for (almost) all the time I was in good old Blighty, it felt decidedly spring-like when I got back. Here's the gorgeous view of Mont Blanc that I had from the plane on the way down:


Beautiful, isn't it? Mont Blanc is so majestic and I feel so privileged to see it almost every day from our bedroom window (depending on how cloudy the sky is). But the view from the plane was really something special.
Well, it felt so spring-like and bright that as soon as the weekend allowed it, I started to spring-clean our flat.
I have inherited the hoarding gene from my mother's side of the family but I do try to fight it! Today I decided that the old cream handbag I bought about five years ago had actually reached the end of its life and I wouldn't be using it again. So off it went to the bin. For about five minutes. Then the salvager inside me sent me right back to get it out again.
The bag was synthetic and badly stained, and I knew I definitely wouldn't be using it again. So why, you may be asking, did I get it out of the rubbish bin? This is why:

That stained cream synthetic bag had hidden treasures! One key holder, one lovely buckle, two rectangular metal rings and a 12cm metal zipper. I reckon if I'd wanted to buy all that stuff it would have cost me quite a lot. And being a crazy crafter, I know I'll use them. The moral of this post is: Throw away what cannot be used again, but don't forget to recover and recycle all the hidden treasures first. Have a great weekend!

Saturday 5 February 2011

Little amigurumi robot free pattern


amigurumi robot
Originally uploaded by aishakenza
I decided to make a toy robot for Charlie, who I'll be seeing later this week. I only see him very occasionally as we live far away from each other. Of course I'll be seeing his older sister and younger brother too, but their toys were ready. I needed to make something for Charlie, and I thought he would like a robot.

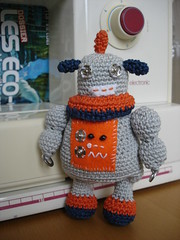
The problem, as I soon discovered, is that there are very few free patterns for amigurumi robots. So guess what? Yes, I made one of my own. Using my favourite Catania yarn and a 2.5 mm hook, I got to work and this is who came out of it.  I might one day make some improvements to the pattern, but as I don't like to keep you all waiting, and I did actually write it down as I went along, I thought you may like to have it straight away. Please feel free to make your own alterations and decorate it as takes your fancy. If you make a robot, I would love to receive a photo. As with my other free patterns, please do not sell this pattern. Do not post this pattern to any website, but link directly to my blog. No file sharing of this pattern.

This robot is not suitable for very small children and babies because of the small parts. If you want to make it for a small child or baby, do not include any embellishments that could be bitten off and swallowed. Decorate it with embroidery instead.

If you see any mistakes, it's because I've not tested the pattern, so please be indulgent and just let me know. If I do make another, better robot, I'll definitely post any changes I make, but here for now is the pattern for you to try.

You'll need:

Catania cotton yarn in grey, orange and blue (or colours of your choice)
2.5 mm crochet hook
A small amount of felt and metal trimmings such as press studs, washers, buttons, beads, etc
Needle and thread
A large-eyed needle
Embroidery thread

Head

Start with a magic ring

rnd 1 - 6 sc into magic ring
rnd 2 - 2 sc in each st around (12 sts)
rnd 3 - [2 sc in next st, 1 sc] rep around (18 sts)
rnd 4 - [2 sc in next st, 2 sc] rep around (24 sts)
rnd 5 - [2 sc in next st, 3 sc] rep around (30 sts)
rnd 6-12 - sc around (30 sts)
Fasten off

Don't stuff the head yet.

Antennae (make 3 - one orange and two blue)

Start with a magic ring

rnd 1 - 5 sc into magic ring
rnd 2-3 sc around (5 sts)
Fasten off


Collars (make 2 - one orange and one blue)

Start with a magic ring

rnd 1 - 6 sc into magic ring
rnd 2 - 2 sc in each st around (12 sts)
rnd 3 - [2 sc in next st, 1 sc] rep around (18 sts)
rnd 4 - [2 sc in next st, 2 sc] rep around (24 sts)
rnd 5 - [1 sc in next 3 st, 2 sc in next st] rep around (30 sts)
rnd 6 - [1 sc in next 4 st, 2 sc in next st] rep around (36 sts)
rnd 7 - [1 sc in next 5 st, 2sc in next st] rep around (42 sts)
Fasten off


Feet and legs (make 2)

Start with the soles of the feet and work your way up. The feet, legs and body are worked in a single piece.

With blue, make a magic ring

rnd 1 - 6 sc into magic ring
rnd 2 - 2 sc in each st around (12 sts)
rnd 3 - [2 sc in next st, 1 sc] rep around (18 sts)
rnd 4-5 - working in back loop only  (ie the loop furthest away from you), sc around.
Attach orange
rnd 6-7 - sc around (18 sts)
rnd 8 - [1 sc in next st, sc2tog], rep around (12 sts)
Attach grey
rnd 9 - sc around (12 sts)
Stuff foot
rnd 10 - working in front loop only, sc around
rnd 11 - 14 sc around (12 sts)

Fasten off

Make another leg, leaving a long tail of yarn to sew it to the in-between legs piece:

ch 6
1 sc in 2nd ch from hook, 1 sc in each st to end, turn
work 4 more rows in sc.
Fasten off, leaving a long tail of yarn to attach it to the first leg.

Body

Now sew the legs together with the in-between piece. Sew each of the 5 sts to the corresponding sts on each leg, it will look something like this: O=O
There should be 7 sts of each leg remaining

Now attach the yarn to the beginning of the remaining 7 sts on one of the legs, and continue as follows:

rnd 1 - 2sc in each of the 7 sts at the top of the leg, 7 sc along the straight piece, 2 sc in each of the 7 sts of the other leg, then 7 sc along the remaining straight edge (42 sts)
rnd 2 - sc around
rnd 3 - *1 sc in each of next 14 sts, 2 sc in each of next 7 sts, repeat from * once again, to end (56 sts)
rnd 4 - sc around
rnd 5-6 - working in  back loop only, sc around
rnd 7-11 - working in both loops, sc around
rnd 12 - *1 sc in each of next 6 sts, sc2 tog, repeat from * to end (49 sts)
rnd 13-14 - sc around
rnd 15 - *1 sc in each of next 5 sts, sc2 tog, repeat from * to end (42 sts)
rnd 16 -17 - sc around
rnd 18 -  *1 sc in each of next 4 sts, sc2 tog, repeat from * to end (35 sts)
rnd 19-20 - sc around
rnd 21 - *1 sc in each of next 3 sts, sc2 tog, repeat from * to end (27 sts)
rnd 22 - sc around
Fasten off.

Don't stuff the body yet

Arms

Start with a magic ring

rnd 1 - 5 sc into magic ring
rnd 2 - 2 sc into each st (10 sts)
rnd 3 - [2 sc in next st, 1 sc] rep around (15 sts)
rnd 4-6 - sc around
rnd 7 - [1 sc in next st, sc2 tog] rep around (10 sts)
Stuff!
rnd 8 - sc2tog 5 times (5 sts)
rnd 9 - 2 sc in each st (10 sts)
rnd 10 - 2 sc in next st, 1 sc] rep around (15 sts)
rnd 11-13 - sc around
rnd 14 - [1 sc in next st, sc2 tog] rep around (10 sts)
Stuff!
rnd 15 - sc2tog 5 times (5 sts)
Fasten off leaving a long tail of yarn and use it to sew a metal washer in the place of a hand. Weave the yarn back up to the top end of the arm so you can use it to sew the arms on the body.

Finishing touches

Head and neck

Attach the antennae to the head, the orange one at the top and the blue ones to the side (I attached them a bit too high - slightly lower would look better, I think).

Sew on two halves of largish silver press-studs for the eyes (keep the other two halves for the front screen decoration).

For the mouth, cut a small rectangle of white felt and attach it to the bottom of the front of the head with orange embroidery thread.

Now stuff the head, and attach it to the orange collar piece, using the long tail of yarn still left on the head. You should have two rows of the collar overlapping.

Body

Cut a square of felt to fit on to the robot's tummy. Decorate it with the two remaining press-stud pieces, some beads and embroidery thread, or whatever takes your fancy. Then sew the piece onto the tummy.

Now sew the arms on to each side of the body. I stitched them on one spot only, so that the arms remain fairly mobile, but if you prefer you can stitch them more solidly onto the body.

Now stuff the body, and then attach the blue collar piece, using the long tail of yarn still left on the body.

Finally, sew the orange and blue collar pieces together, making sure your robot's face is in the right position.

Charlie loves his robot!